Tape-in hair
extensions are one of the most popular hair extension methods available today. Fast
installation, gentle application and the ability to reuse the hair makes them
unique from other methods.
Tape-ins are a newer method of applying hair extensions, in which an adhesive tape is used to attach the extension to the natural hair. It is quickly becoming a very popular way of thickening and lengthening your client’s hair.
Tape-ins are sold in wefts instead of individual strands. Each weft is 1 ½” wide and has the same amount of hair as 3-4 keratin strands. Since the hair is spread evenly on the weft, each piece fills in fine/thin hair without looking stringy. When installed correctly, they have a flat, seamless finish.
Tape-in wefts cause less stress on hair than individual strand extensions, which makes them particularly great for thinner, more easily damaged hair. Installation time is also significantly less than fusion or beaded extensions.
How long do tape-in hair extensions last?
If they are cared for properly, tape-ins can last 5 months or longer. We recommend moving the hair up every four to six weeks. The hair can be reused two to three times which gives the client three to six months in between replacing the hair.
Although it’s an easier method than some of the others, it’s best to have a professional stylist install and move them up.
How to Install Tape-In Hair Extensions – professional application recommended
- Start with clarified, clean hair. No conditioner.
- Figure out how much hair you need ahead of time, it is not fun to run out of hair. Most people need 3-5 packs for a full application of Donna Bella Tape-ins 4-7 packs will be needed for Euro SoCap/Seiseta Tape-ins. At Vision Hair Extension you may return hair if the hair is in original condition and the packaging has not been damaged. Call for a RMA#
- Don’t take off the tape backing until you’re done sectioning the hair.
- Avoid touching the sticky parts as much as possible so oils from your hands don’t weaken the adhesive (this leads to slippage)
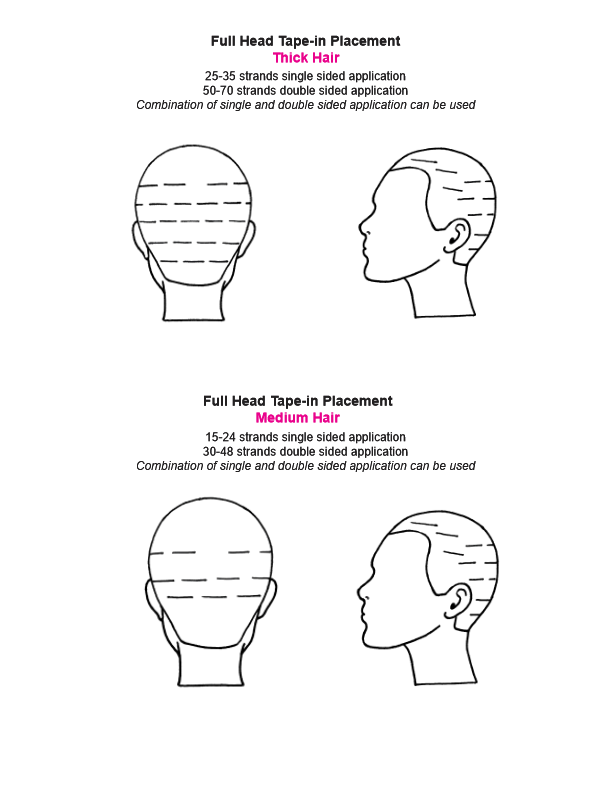
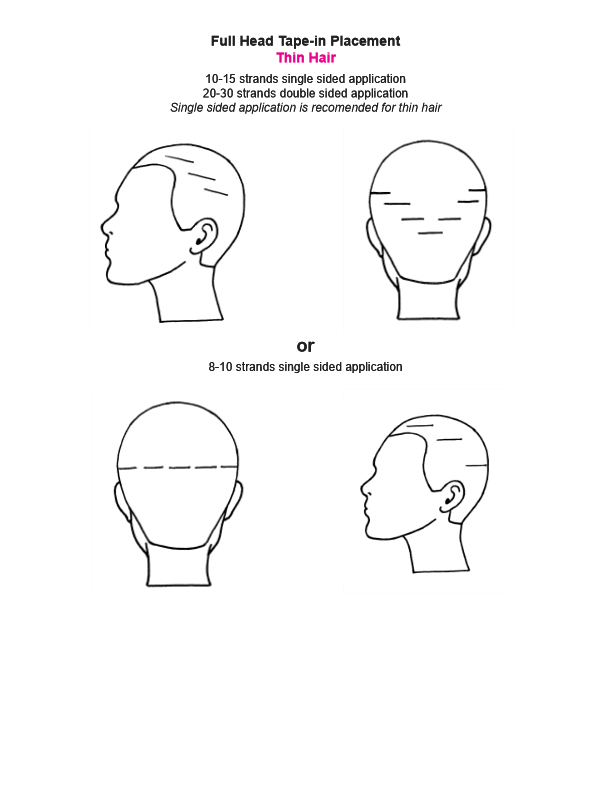
- Scroll down to see placement ideas.
Removing Tape-In Extensions
Just as important as installing the hair is removing it properly to avoid damage. Move-ups are more time consuming than the actual installation, since you must clarify and re-tape before installation. We recommend having two appointments each time you move hair up. One to remove, and one to reinstall. You can also have 2 sets of extensions. Re-taping of the newly removed hair can be done when there is spare time. With 2 sets the removal and installation can be done in one appointment.
- Use a clear oil tape-in bond remover (not a keratin bond remover).
- Use a Tape-In Hair Extension Placement Card to hold your extensions and remember where the wefts go.
- Wash and clarify, don’t condition.
- With clean hands, use replacement tape to re-apply the extensions.
How to Care for Tape-In Extensions
- Wash & condition with sulfate-free products only!
- Avoid any conditioners near the tape. Conditioners on the tape may cause slippage.
- Try to air dry whenever possible and be gentle when brushing. Go from the bottom up, holding the extensions to avoid pulling. Use the right brush, (Loop Brush) & leave-in conditioners, and try to avoid brushing when wet.
- Always use a heat protectant before straightening, curling, or using any form of high heat.
- Don’t go to bed with wet hair.


